ShopDreamUp AI ArtDreamUp
Deviation Actions


Suggested Deviants


Suggested Collections


You Might Like…


![[Art Trade] Netebreaker](https://images-wixmp-ed30a86b8c4ca887773594c2.wixmp.com/f/cccd1c7f-8466-4b37-88e7-05eb08a3c06f/ddg3bkl-50b84e45-2813-4010-9fa3-c7c03c3d2ca5.png/v1/crop/w_184,h_184,x_0,y_20,scl_0.087828162291169,q_70,strp/_art_trade__netebreaker_by_doveelli_ddg3bkl-92s-2x.jpg?token=eyJ0eXAiOiJKV1QiLCJhbGciOiJIUzI1NiJ9.eyJzdWIiOiJ1cm46YXBwOjdlMGQxODg5ODIyNjQzNzNhNWYwZDQxNWVhMGQyNmUwIiwiaXNzIjoidXJuOmFwcDo3ZTBkMTg4OTgyMjY0MzczYTVmMGQ0MTVlYTBkMjZlMCIsIm9iaiI6W1t7ImhlaWdodCI6Ijw9MTgzMyIsInBhdGgiOiJcL2ZcL2NjY2QxYzdmLTg0NjYtNGIzNy04OGU3LTA1ZWIwOGEzYzA2ZlwvZGRnM2JrbC01MGI4NGU0NS0yODEzLTQwMTAtOWZhMy1jN2MwM2MzZDJjYTUucG5nIiwid2lkdGgiOiI8PTEyODAifV1dLCJhdWQiOlsidXJuOnNlcnZpY2U6aW1hZ2Uub3BlcmF0aW9ucyJdfQ.HV-qR5ePAO5A9BMWjqAQrppgDgPgQt7jZ37Z0U-2dKI)
![[Art Trade] Netebreaker](https://images-wixmp-ed30a86b8c4ca887773594c2.wixmp.com/f/cccd1c7f-8466-4b37-88e7-05eb08a3c06f/ddg3bkl-50b84e45-2813-4010-9fa3-c7c03c3d2ca5.png/v1/crop/w_92,h_92,x_0,y_10,scl_0.043914081145585,q_70,strp/_art_trade__netebreaker_by_doveelli_ddg3bkl-92s.jpg?token=eyJ0eXAiOiJKV1QiLCJhbGciOiJIUzI1NiJ9.eyJzdWIiOiJ1cm46YXBwOjdlMGQxODg5ODIyNjQzNzNhNWYwZDQxNWVhMGQyNmUwIiwiaXNzIjoidXJuOmFwcDo3ZTBkMTg4OTgyMjY0MzczYTVmMGQ0MTVlYTBkMjZlMCIsIm9iaiI6W1t7ImhlaWdodCI6Ijw9MTgzMyIsInBhdGgiOiJcL2ZcL2NjY2QxYzdmLTg0NjYtNGIzNy04OGU3LTA1ZWIwOGEzYzA2ZlwvZGRnM2JrbC01MGI4NGU0NS0yODEzLTQwMTAtOWZhMy1jN2MwM2MzZDJjYTUucG5nIiwid2lkdGgiOiI8PTEyODAifV1dLCJhdWQiOlsidXJuOnNlcnZpY2U6aW1hZ2Uub3BlcmF0aW9ucyJdfQ.HV-qR5ePAO5A9BMWjqAQrppgDgPgQt7jZ37Z0U-2dKI)


Description
[EDIT!] Fixed and added some more info for few steps. Sorry! >3<[EDIT]
Sorry for the extra long file! >333<
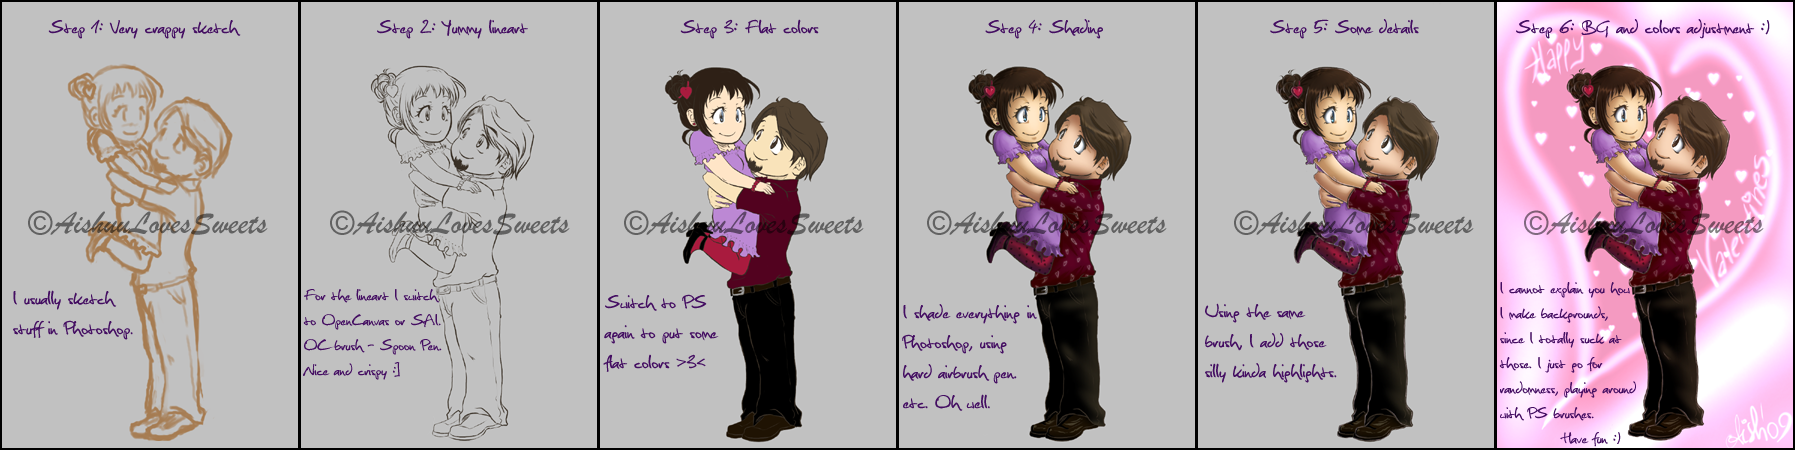
So, this is how I do it.
And no, there isn't a bigger version of this, I had to make it that small, cause dA didn't want to upload it for me D8<
I had hard times with the actual picture (which can be found here: [link]), because while I was coloring it, being almost done, my computer decided to die, so I had to start all over again. Saving step by step [kinda] gave me the idea many of you guys were asking me for. I don't know if it would work well as a tutorial for you, but I tried.
I swear, someday I'll make a badass tutorial.
Anyway, since I didn't have much space for text, here's more information and instructions if you need any: ^^
Step 1. I draw my sketches using the exact same brush as for coloring - hard airbrush pen, but I reduce its size. Looks rough and not that awesome, but oh well. That's me. By the way, I'm using Photoshop 7.0. Still can't get used to other ones, and 7.0 is the only one I trust _^_
Step 2. The program I use to make a lineart is Open Canvas 4PE or which ever is better for you, but I don't know if older versions also have the Spoon pen or not. And Spoon pen is what I usually use to draw the lineart, also reducing the size of it from standard 3px to 2px. Remember to create a new layer for lines! Btw, all my pictures are drawn on a transparent layers, so it's easier to color and put backgrounds later. Once I'm done with the lineart, I delete the sketch layer.
Step 3. Once I'm done with my awesome crispy and super clear lines, I open the image in Photoshop again, and after creating a new layers for each part of the image [like skin, hair, shirt, boots etc.], I pick a Hard round brush of whatever size I want, and start putting flat colors. I think it's safer if you add new layers for each fragment, because once you'll start shading, the different parts won't blend 8D Like, my hair was painted on a different layer than his. Remember - always lock each layer after putting a color, so you won't have problems with "going out of border" while shading :3
Step 4. Then I pick Hard airbrush of any size is necessary, pick darker colors for shades, and start painting! Remember to keep the light source in one point if you have more than one character, otherwise the picture would look odd. As you see, my silly light source is placed on the right side. Kinda.
Step 5. Depending on if you want it or not, you can add those cute highlights [or whatever they are] on the edges of your characters. I do it, because I think it looks cute X3 Same brush in Photoshop.
Step 6. Before adjusting colors or making a background, I hop to the top layer on my layers list, ans Merge Down each one to another [it can last forever if you have many layers, but it's alright], leaving the background layer. That makes me able to move my characters or center them if it's needed [the Move Tool].
To adjust the colors [if you think it's needed], I choose Image>Adjustments>Variations or Image>Andjustments>Hue/Saturation. I remove the ugly gray background layer, or just erase the greyness OR - replace it with different color to start drawing my background. As for backgrounds, holy cow, I have no idea how to show you my way. I never plan a bg, and even if I do, it never comes out as I desire X'D Go for randomness! 8D
Hookay
If you still have any questions, feel free to ask.
I'm so sorry. I hope my failed tutorial will be somehow helpful for you.
I really tried.
So, what do you think?
---
Shameless tutorial made using the picture of mine [link]
Both things belong to (me)
(me)
Sorry for the extra long file! >333<
So, this is how I do it.
And no, there isn't a bigger version of this, I had to make it that small, cause dA didn't want to upload it for me D8<
I had hard times with the actual picture (which can be found here: [link]), because while I was coloring it, being almost done, my computer decided to die, so I had to start all over again. Saving step by step [kinda] gave me the idea many of you guys were asking me for. I don't know if it would work well as a tutorial for you, but I tried.
I swear, someday I'll make a badass tutorial.
Anyway, since I didn't have much space for text, here's more information and instructions if you need any: ^^
Step 1. I draw my sketches using the exact same brush as for coloring - hard airbrush pen, but I reduce its size. Looks rough and not that awesome, but oh well. That's me. By the way, I'm using Photoshop 7.0. Still can't get used to other ones, and 7.0 is the only one I trust _^_
Step 2. The program I use to make a lineart is Open Canvas 4PE or which ever is better for you, but I don't know if older versions also have the Spoon pen or not. And Spoon pen is what I usually use to draw the lineart, also reducing the size of it from standard 3px to 2px. Remember to create a new layer for lines! Btw, all my pictures are drawn on a transparent layers, so it's easier to color and put backgrounds later. Once I'm done with the lineart, I delete the sketch layer.
Step 3. Once I'm done with my awesome crispy and super clear lines, I open the image in Photoshop again, and after creating a new layers for each part of the image [like skin, hair, shirt, boots etc.], I pick a Hard round brush of whatever size I want, and start putting flat colors. I think it's safer if you add new layers for each fragment, because once you'll start shading, the different parts won't blend 8D Like, my hair was painted on a different layer than his. Remember - always lock each layer after putting a color, so you won't have problems with "going out of border" while shading :3
Step 4. Then I pick Hard airbrush of any size is necessary, pick darker colors for shades, and start painting! Remember to keep the light source in one point if you have more than one character, otherwise the picture would look odd. As you see, my silly light source is placed on the right side. Kinda.
Step 5. Depending on if you want it or not, you can add those cute highlights [or whatever they are] on the edges of your characters. I do it, because I think it looks cute X3 Same brush in Photoshop.
Step 6. Before adjusting colors or making a background, I hop to the top layer on my layers list, ans Merge Down each one to another [it can last forever if you have many layers, but it's alright], leaving the background layer. That makes me able to move my characters or center them if it's needed [the Move Tool].
To adjust the colors [if you think it's needed], I choose Image>Adjustments>Variations or Image>Andjustments>Hue/Saturation. I remove the ugly gray background layer, or just erase the greyness OR - replace it with different color to start drawing my background. As for backgrounds, holy cow, I have no idea how to show you my way. I never plan a bg, and even if I do, it never comes out as I desire X'D Go for randomness! 8D
Hookay
If you still have any questions, feel free to ask.
I'm so sorry. I hope my failed tutorial will be somehow helpful for you.
I really tried.
So, what do you think?
---
Shameless tutorial made using the picture of mine [link]
Both things belong to
(me)Image size
1795x450px 491.2 KB
Comments18
Join the community to add your comment. Already a deviant? Log In
Nice tutorial 
I don't have Open Canvas or SAI but I'm hoping soon I can get Open Canvas and try your tutorial out")
I don't have Open Canvas or SAI but I'm hoping soon I can get Open Canvas and try your tutorial out